**Looking for the Linky Party? Scroll down it's next!**
Hello all and welcome to the "Tute" part of Tute {Yourself} Tuesday!
Sorry I'm a little late in getting this up this morning, Little Eme had a Doctor's Appointment. Don't worry, he's not sick! Just a little late in getting in for his 12 month check up. I'm happy to report that he's growing well (even though he's TINY!) and that all looks good. :)
Anyway! You all are here for a tutorial right!? Not updates on growth. lol.
This week I was inspired by my friend Natalie's project. She has just started her own crafty blog and posted a tute on how to make a super pretty wreath. But, you'll remember that I made a "wreath" last week, so I prolly don't (doesn't mean I WON'T though...) need to make another one. But I loved the crepe paper rosettes that she made to cover her wreath! So what's a girl to do?
Well the idea rolled around in my head for a while and then I had an "Ah HA!!" moment.
This is the result of that "Ah HA!":
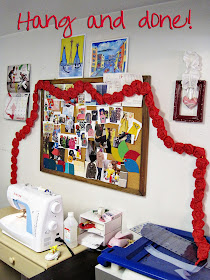
Garland is no longer confined to Christmas!! Woot! The best part (I think) about this garland is that it isn't confined to just one holiday. You could do something similar in many different colors for Easter, a baby shower, birthday party (or for Valentine's day as I have.) I'll be honest; this garland might have found a permanent home adorning my inspiration board.
Since I made my rosette differently then Natalie did (mine's more like a flat pancake cinnamon roll) I am going to take you through my whole process.
I recommend NOT cutting the strands first, because there will be some shrinkage in length. The easiest way to braid the crepe paper while still on the rolls is to keep the rolls as wound up as possible and just move the rolls around. Do the on some kind of surface (I used the couch) and have someone hold the end. DON'T skip this step!! You need the extra strength that the braid lends to hold the weight of the rosettes.
It's going to be wide, but kind of flat- this will help it lay better on the garland.
If you put it all over the back you are going to burn your fingers when you put it on the braid. (The rosette is much wider then the braid. So, for the sake of your fingers, keep it in the middle people! :) )
I decided to decorate my sewing/inspiration board area. What do you think? :)
I'll be linking this tute up to the fab linky parties on my side bar.


Very cute and decorative :) Thank you for this tutorial on the garland! V-DAY is sure coming up!!
ReplyDeleteI have a giveaway going on over at my blog!
Come check it out!
www.tootsiewootsieboutique.blogspot.com
LOVE it! It turned out way cute! I'm thinking I might try some for Molly's room!
ReplyDeleteThanks for linking me. You're awesome!
This is a great tutorial love the idea so much, I just found you thanks to Trendy Treehouse!
ReplyDeleteVery nice, and easier than I thought! Thanks for all the pictures.
ReplyDeletesaw you on Not Just a Housewife- what a CUTE project!! I neeever would have guessed that it's from crepe paper! thanks for sharing :D I feel inspired to go make a garland now hehe!
ReplyDeleteReally cute! I made rosettes today. Mine are out of old t-shirts. You can't have to many or to much!
ReplyDeleteJo @ SmileMonsters
So cute :)! Looks amazing!
ReplyDeleteWho would have thought of braiding the crepe paper? Not I. Great idea! I'm your newest follower. I'd love for you to follow back!
ReplyDeletehttp://theloops13.blogspot.com
I can't believe that's crepe paper it looks so lux in the pictures and so cool! What a fun decoration and it would be pretty in other colors too, my daughter would love one in blue for her room for all year long.
ReplyDeletethis is so cute!! I love this! I wish I had somewhere I could make one to put it :)
ReplyDeleteI love your Garland. I might have to copy you and make one next year.
ReplyDeletePretty! Love the color!
ReplyDeleteI've only used crepe paper as streamers for a birthday party, but I'm noticing it is a new trend to make cute things in blogland. I like how you used yours for a garland. Great for Valentine's pay, a birthday, or just for a cute decoration any time. Thanks for sharing!
ReplyDeleteWhat a great idea, I need to try this! Doesn't look like crepe paper on the computer!
ReplyDeleteMust try this, there had to be some crepe paper in my stash somewhere!
ReplyDeleteSo cute. Seriously good stuff!
ReplyDeleteThat is just beautiful and a great tutorial!
ReplyDeleteSo beautiful!
ReplyDeleteI love this! Such a cute, inexpensive way to amp up your party decor!
ReplyDelete